Mutation with Transaction
API에서 Transaction이란 데이터를 조작하는 로직들이 모두 성공하거나 모두 실패하도록 묶은 하나의 단위를 의미한다. 이전 글에서는 content를 하나만 저장하는 muataion을 작성하고 실행했었다. 만약 서로 다른 content 두 개를 모두 저장해야 하는 mutation을 작성한다면 저장하는 두 로직을 하나의 transaction에 묶어야 한다. 이렇게 되면 한 content를 저장하고 나머지 한 content를 저장하기 전에 에러가 발생하면 이전에 content를 저장한 행위를 취소시킨다. 이번 글에서는 Mongoose를 이용하여 mutation에 transaction을 구현하겠다. Mongoose의 스키마 코드는 이전 글과 동일하다.
이전 글 (4. Graphql Mutation)
https://jongbeom-dev.tistory.com/184?category=902825
[Graphql, MongoDB 실습] 4. Graphql Mutation
Graphql Mutation 이전까지는 resolver에서 쿼리와 객체의 요소에 대한 쿼리를 처리하기 위한 로직을 작성하였다. 쿼리는 데이터를 조회하는 기능을 담당하고 데이터를 조작하는 로직은 resolver의 muataio
jongbeom-dev.tistory.com
graphql/schema/index.js
const { gql } = require('apollo-server');
const typeDefs = gql`
  type Content {
    _id: ID
    title: String
    content: String
    createdAt: String
  }
  input ContentInput{
    title: String
    content: String
  }

  type Mutation{
    createContent(contentInput: ContentInput): [Content]!
  }
`;

module.exports = typeDefs;
createContent이라는 함수를 mutation에 정의하고 ContentInput이라는 Input을 정의하였다.
graphql/resolvers/index.js
const Content = require('../../models/content');
const { startSession } = require('mongoose');
const resolvers = {
  Content: {
    _id(_, args) {
      return _._id;
    },
    title(_, args) {
      return _.title;
    },
    content(_, args) {
      return _.content;
    },
    createdAt(_, args) {
      return _.createdAt;
    }
  },
  Mutation: {
    async createContent(_, args) {
      const session = await startSession();
      try {
        session.startTransaction();
        const content1 = new Content({
          ...args.contentInput
        })
        const content2 = new Content({
          ...args.contentInput
        })
        const result = []
        result.push(await content1.save({ session }));
        // Test transaction with this!
        //throw new Error('Error in createContent2');
        result.push(await content2.save({ session }));
        await session.commitTransaction();
        return result;
      } catch (err) {
        await session.abortTransaction();
        console.log(err);
        throw err;
      } finally {
        await session.endSession();
      }
    }
  }
};

module.exports = resolvers;
다음과 같이 Mongoose의 startSesstion 객체를 이용하면 간단하게 transaction을 구현할 수 있다. 구현 과정은 다음과 같다.
- startSession 함수를 호출하여 session을 생성한다.
- session 객체의 startTransaction 함수를 호출한다.
- transaction에 묶을 로직들을 수행한다.
- transaction이 끝나면 session 객체의 commitTransaction 함수를 호출한다.
- transaction 내에서 에러가 발생하면 session 객체의 abortTransaction 함수를 호출한다.
- session 객체의 endSession 함수를 호출하여 session을 종료한다.
Playground 실행
애플리케이션을 실행하고 playground에서 다음과 같은 mutation을 작성한다.
mutation{
  createContent(contentInput:{
    title:"제목"
    content:"내용"
  }){
    _id
    title
    content
    createdAt
  }
}
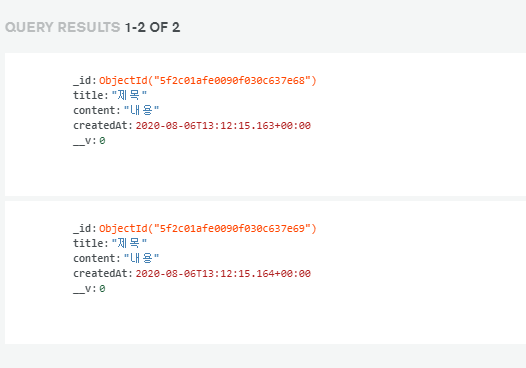
createContent라는 Mutation을 작성하고 인자로 contentInput Input을 전달한다. 반환된 값은 생성한 content 객체의 배열이다. 실행 결과는 다음과 같다.

MongoDB를 확인하면 다음과 같다.

Mutation 코드에서 에러를 발생시키는 코드의 주석을 풀면 content 가 모두 생성되지 않음을 확인할 수 있다. Transaction 없이 mutation을 작성하면 content 객체가 하나만 저장된다.
참고자료
https://mongoosejs.com/docs/transactions.html
Mongoose v5.9.27: Transactions
Transactions in Mongoose Transactions are new in MongoDB 4.0 and Mongoose 5.2.0. Transactions let you execute multiple operations in isolation and potentially undo all the operations if one of them fails. This guide will get you started using transactions
mongoosejs.com
'개인 개발 프로젝트 > Graphql, MongoDB 실습' 카테고리의 다른 글
| [Graphql, MongoDB 실습] 7. 1:N 관계 예시 (1) (0) | 2020.08.08 |
|---|---|
| [Graphql, MongoDB 실습] 6. 1:N 관계 (0) | 2020.08.08 |
| [Graphql, MongoDB 실습] 4. Graphql Mutation (0) | 2020.08.05 |
| [Graphql, MongoDB 실습] 3. Graphql 기본 쿼리 예제 (0) | 2020.08.05 |
| [Graphql, MongoDB 실습] 2. MongoDB 연동 (0) | 2020.08.05 |